Introduction
The pictures we take every day with our mobile or any camera that supports location tagging, contain information on location where the picture was taken. This can be extracted using wide variety of languages like php, javascript, java, etc but today we will be seeing a working model with php.
Prerequisites
The article assumes that the user knows PHP and basic Javascript as well. I will be using jQuery to perform asynchronous file uploads and in case if you don’t know, please read it all here on jQuery.
EXIF Metadata
DEMO: link provided at the end of this article.
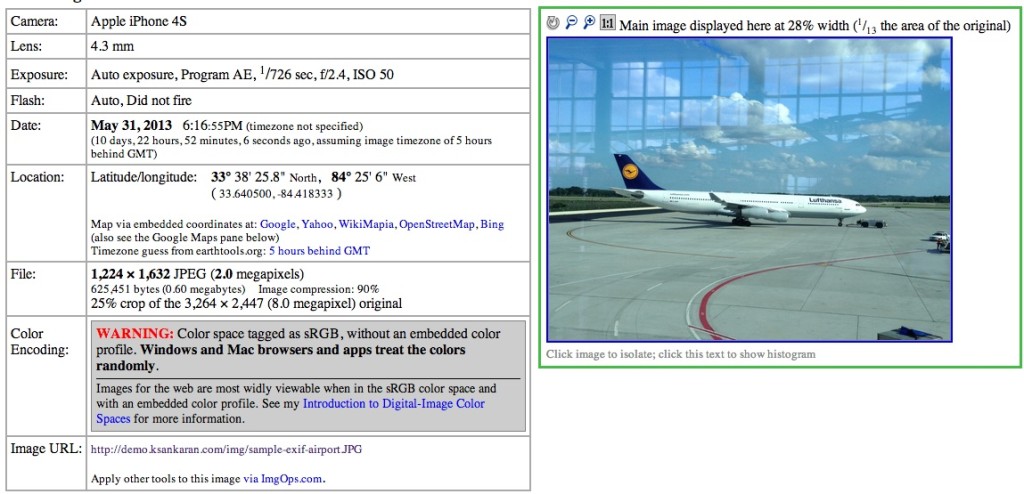
EXIF (exchangeable image file) data is a record, showing settings used to take a photograph. This data is recorded into the actual image file. Therefore each photograph has its own unique data. EXIF data stores information like camera model, exposure, aperture, ISO, what camera mode was used and whether or not a flash fired and location information as well.
The image below is an example of what EXIF data looks like. This information differs depending on what EXIF reader is used to see the metadata. The following sample picture is taken with my iPhone 4S and hence you can see all that information here.

Reading EXIF Metadata from PHP
Reading EXIF metadata from PHP is quite easy and straightforward. However, in our case, we give the option for the user to upload the image or use the sample we have in our server. The HTML page bearing the google maps waits for the response from PHP on the exif metadata. Once the data is received, we try to plot the same on the map.
The following code tries to upload the file asynchronously to server to read the image file.
var formData = new FormData($('form')[0]); $.ajax({ url: 'upload.php', //server script to process data type: 'POST', success: function(data, textStatus, jqXHR) { ... }, error: function(jqXHR, textStatus, errorThrown) { ... }, // Form data data: formData, //Options to tell JQuery not to process data or worry about content-type cache: false, contentType: false, processData: false }); |
Now, on the server side, process the image and sends back the response in JSON format – which is quite easy to display data at different places.
$currFileLocation = $_FILES["file"]["tmp_name"]; $imagedata = file_get_contents($currFileLocation); $base64image = base64_encode($imagedata); $exif = exif_read_data($currFileLocation); if(array_key_exists('GPSLongitude', $exif) && array_key_exists('GPSLatitude', $exif)) { $lng = getGps($exif["GPSLongitude"], $exif['GPSLongitudeRef']); $lat = getGps($exif["GPSLatitude"], $exif['GPSLatitudeRef']); $response = array( "status" => "success", "reason" => "", "gps" => array( "lat" => $lat, "lng" => $lng ), "img" => urlencode($base64image) ); } else { $response = array( "status" => "fail", "reason" => "The uploaded picture does not have GPS information.", "exif" => $exif ); } |
getGps is a utility method written by a developer and was posted at Stack Overflow. The code is below:
function getGps($exifCoord, $hemi) { $degrees = count($exifCoord) > 0 ? gps2Num($exifCoord[0]) : 0; $minutes = count($exifCoord) > 1 ? gps2Num($exifCoord[1]) : 0; $seconds = count($exifCoord) > 2 ? gps2Num($exifCoord[2]) : 0; $flip = ($hemi == 'W' or $hemi == 'S') ? -1 : 1; return $flip * ($degrees + $minutes / 60 + $seconds / 3600); } function gps2Num($coordPart) { $parts = explode('/', $coordPart); if (count($parts) <= 0) return 0; if (count($parts) == 1) return $parts[0]; return floatval($parts[0]) / floatval($parts[1]); } |
Getting the response and plotting to map is quite easy. The map is already loaded on the page and points to a default location. We are going to alter our center point as well as add marker with Info Window.
moveCenterAndPlaceMarker : function(data) { var geo = data.gps; console.log("moving marker: " + JSON.stringify(geo)); var latLng = new google.maps.LatLng(geo.lat, geo.lng); map.setCenter(latLng); map.setZoom(14); var contentString = '<div style="width: 200px; height: 150px;">The picture you took at this place is:<img width="120" height="120" src="data:image/jpeg;base64,'+data.img+'"></div>'; var marker = new google.maps.Marker({ map: map, position: latLng, title: 'The picture was taken right here! (I guess...)' }); google.maps.event.addListener(marker, 'click', function() { infowindow.setContent(contentString); infowindow.open(map, marker); }); } |
One thing you might not have noticed is the conversion of image we uploaded to base64 format. That format is returned and is loaded inside the google info window showing the image inside the google’s popup.
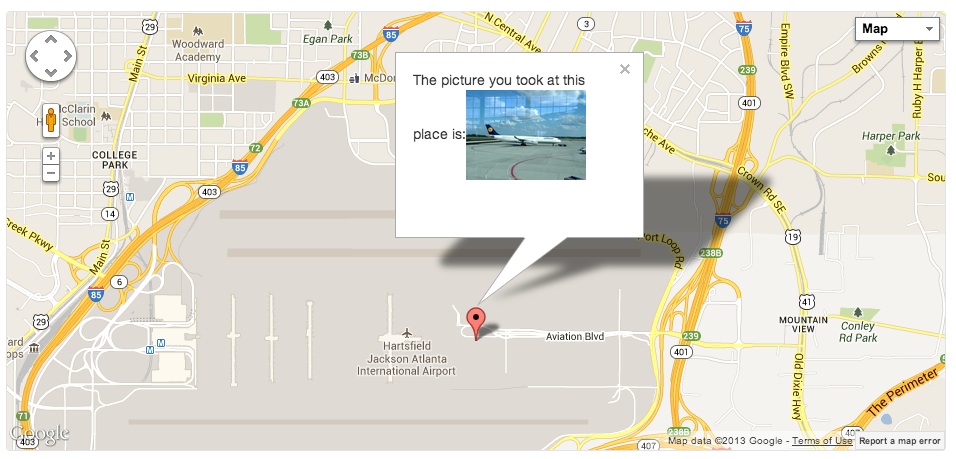
As you can see, the following picture is taken by me at the airport and the picture’s GPS co-ordinates is bang on the target.

DEMO: link here.
Conclusion
What did we just see: We saw the basics of EXIF metadata, how to do that in PHP, how to upload a file asynchronously in jQuery and parse EXIF data and get back. Also, we saw loading non-url images inside google info window.
