Introduction

This article assumes that the user is aware of the process by which a webpage renders on a browser, how the resources are fetched, etc. The document also assumes that the user have basic understanding of browser caches and cache headers. This article provides the basic information on using appcache and a demo page to explain its benefits.

AppCache vs Browser Cache

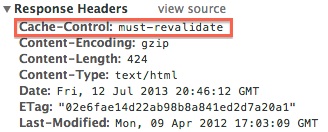
When a page is requested on the browser without appcache, there will be a sequence of network requests sent from the browser to the server. The first request is the actual page (raw html) you wanted to load. Then browser reads the html and process them line by line. Every script tag, css link tag or any other resources on the page are requested sequentially. Each of this requests may be cached in the browser and this forms the browser cache. I said “may be” because the rule for a resource getting cached is: resource headers sent from your server. See example below:
cachecontrolexample

So, it is evident that a browser cannot cache these items unless and otherwise, we visit the page and also depends on headers received for individual resources. But, what if you want to cache the extra few items that needed to display next page? What if, your website need to work offline and sync only when needed or when the user gets online? What if, you have a website which have separate layer for presentation/logic and separate layer for data and like to store all the presentation/logic offline? The answer is simple and straightforward: AppCache.
Now, let’s not get excited and convert all our websites to webapp. HTML5 AppCache is designed for offline webapps – make no mistake. A simple error such as app-caching a dynamic data would result in rendering outdated website. So, it takes time to understand AppCache and make sure you appcache the right set of resources.

How to do it?

Well, its pretty simple. Write a manifest file describing the items to be cached, network behavior, fallback, etc and mention the manifest in the HTML. That’s it.
A sample would be below:

CACHE MANIFEST
# ======================================
# AppCache Manifest - version 0.1
# ======================================
CACHE:
#JS files
#CSS files
#Images
NETWORK:
# Resources that require the user to be online.
FALLBACK:
# static.html will be served if main.py is inaccessible
/main.py /static.html
# offline.jpg will be served in place of all images in images/large/
images/large/ images/offline.jpg
# offline.html will be served in place of all other .html files
*.html /offline.html

NOTE: The CACHE MANIFEST string should be the first line and is required.
CACHE:
This is the default section for entries. Files listed under this header (or immediately after the CACHE MANIFEST) will be explicitly cached after they’re downloaded for the first time.
NETWORK:
Files listed under this section are white-listed resources that require a connection to the server. All requests to these resources bypass the cache, even if the user is offline. Wildcards may be used.
FALLBACK:
An optional section specifying fallback pages if a resource is inaccessible. The first URI is the resource, the second is the fallback. Both URIs must be relative and from the same origin as the manifest file. Wildcards may be used.
Now add the manifest to the html file.

<html manifest="example.appcache">
  ...
</html>

Cache Update

The tricky part is updating the cache items. When the content on the server is changed, the browser will not know the change and will continue to use the outdated data on the webpage. The appcache manifest should be fetched everytime by the browser to determine the items that has to be refreshed. Hence, it is VERY IMPORTANT to make sure appcache manifest is never cached by the browser or at least not for a long time. For that, it is important that the headers sent by the webserver for the manifest also includes the expiry time. It is also possible to update the appcache via the javascript like

var appCache = window.applicationCache;
appCache.update(); // Attempt to update the user's cache.
...
if (appCache.status == window.applicationCache.UPDATEREADY) {
  appCache.swapCache();  // The fetch was successful, swap in the new cache.
}

It is also possible to clear the cache when the user clears the same in his/her browser. However, that is not a valid workflow for updating the cache.

The Gotchas

The appcache also caches the base page. This means, if you later change the base page to include an additional library or UI, it will not be fetched from server unless there is a manifest file update. In order to bypass this functionality, it is ok to include the appcache in a temporary html and include the temp html as an iframe in the base page (See demo link below). By this way, you still cache the manifest items but the base page will not be cached by the appcache unless specified in the manifest.

Demo link

Conclusion

We saw the basic differences between appcache and browser cache with a basic example to include app caches. The example link also shows how to include the appcache by not affecting the cache of the base page by providing manifest in a temp html and loading the same in a iframe.

Introduction

The article explains how to generate dynamic script from a backend language, such as PHP in this case. There are many reasons to choose a dynamic script over generation of JSON data that client can write script on such as 1) Restrict the client from manipulating data. 2) just provide a helper API that would just do the job. 3) Formation of feasible JS data structure is not possible.

Prerequisites

The article assumes that user knows PHP and JavaScript basics. We will be trying to read the .properties file from php, parse the configuration, understands what user wants to, prints the logic in JS and load the same in HTML to test the logic. I would also recommend you have some basic knowledge on recursive method call techniques as well. To know more on recursion, please read here.

Defining a Problem Statement

Let’s try and define the problem we are trying to solve. Consider a use-case where you have a properties file on the server and we have to use this file to show a message in the front end. Well, it is not a straightforward map of key1 to value1. Assume that, it is complex configuration of three level key to a value and each level can have wild card character ‘?’ to accept any value at that level or contain range at every level. Example: “28|71-100|?=text3″ -> if level1 value is 28 and level2 value is between 71 and 100 and level3 at any value, then the text to be used is “text3″.

Parse Properties and Generate Script

Assume that our file has one configuration per line and the first step is to understand the properties file and getting ready for generation.

$key1 = 't';
$key2 = 'w';
$key3 = 't';
function get_object_from_params($paramStr, $assignValue, $label) {
    if($paramStr == '?') {
        $paramObj = Array(
            $label => $assignValue
        );
    }
    else {
        $ranges = preg_split("/-/", $paramStr);
        if(count($ranges) == 2) {
            $paramObj = Array(
                ">" => $ranges[0],
                "<" => $ranges[1],
                $label => $assignValue
            );
        }
        else {
            $paramObj = Array(
                "==" => $ranges[0],
                $label => $assignValue
            );
        }
    }
    return $paramObj;
}
 
function parse_icon_config($txtProperties) {
    $result = array();
    $lines = preg_split("/\n/", $txtProperties);
    global $key1, $key2, $key3;
    foreach($lines as $i => $line) {
        $lineparts = preg_split("/=/", $line);
        $textvalue = $lineparts[1];
        $configparts = preg_split("/\|/", $lineparts[0]);
        if(count($configparts) == 3) {
            $windSpeed = $configparts[2];
            $temp = $configparts[1];
            $iconCode = $configparts[0];
 
            $windObj = get_object_from_params($windSpeed, $textvalue, $key3);
            $tempObj = get_object_from_params($temp, $windObj, $key2);
            $iconObj = get_object_from_params($iconCode, $tempObj, $key1);
 
            array_push($result, $iconObj);
        }
    }
 
    return $result;
}
 
$properties = file_get_contents('config/iconconfig.properties');
$propertiesObj = parse_icon_config($properties);

The above snippet parses the configuration file and generates array of config objects – one per each line. Since there is a three level key and each level parsing is almost the same, lets write a recursive method to generate the script.

function recursive_print($obj, $label) {
    global $key3;
    if(is_string($obj)) {
        return ('return \'' . $obj . '\';');
    }
 
    foreach ($obj as $key => $value) {
        if($key != '==' && $key != '>' && $key != '<') {
            $nextLabel = $key;
            $nextObj = $value;
        }
    }
    if(array_key_exists("==", $obj)) {
        return 'if(' . $label . '==' . $obj['=='] . '){' . recursive_print($nextObj, $nextLabel) . '}';
    }
    else if(array_key_exists(">", $obj) && array_key_exists("<", $obj)) {
        return 'if(' . $label . '>' . $obj['>'] . ' && '. $label .'<' . $obj['<'] . '){' . recursive_print($nextObj, $nextLabel) . '}';
    }
    else {
        return 'if(true){' . recursive_print($nextObj, $nextLabel) . '}';
    }
}
 
function get_function_text($iconCodesConfig) {
    global $key0,$key1,$key2;
    $functionCode = '';
    foreach ($iconCodesConfig as $iconConfig) {
        $functionCode .= recursive_print($iconConfig, $key0);
    }
    return 'window.getDynamicText = function('.$key0.','.$key1.','. $key2.'){' . $functionCode . 'return \'not found. some default value.\'}';
}

At each level, we analyze the data and print the appropriate conditionals in the JavaScript and then call the same method again with the next level until we reach the last level.

Our javascript generation is ready, when the PHP is requested, this is what we get:
jsgenresponse

Now, using it in our HTML is quite easy. As many other APIs out there, it loads in the window namespace and waits for us to call.

<script src="jsgen.php"></script>
....
<button ... onclick="validateAndGet()">Get Dynamic Text</button>

Here is a demo link.

demosnap

Conclusion

What did we just do: we discussed a set of use cases when we need a dynamic script rather than just data, picked up a particular scenario and worked on the same to generate a dynamic javascript using PHP and recursion techniques.

Introduction

This article will discuss on the various image loading techniques in web and functionality of each of them. Mostly, we write img tags and leave it at that and we don’t care what happens from there. But, it’ll really comes back to haunt us later when there are plenty of images on the site and web site drags itself.

Techniques

Baseline JPEG rendering

DEMO: link here
Baseline JPEGs are the default JPEG files we use. The images are rendered from top to bottom with each layer after another. Please look at the below GIF for understanding the loading process.

baseline-anim

Now to the details, the image is fetched from the server and as soon as it gets a line, it draws there. As you can see from a test below, it took 7.6 seconds to complete the image rendering and the spinner was spinning till the end – which means, you are having a bad user experience of just painting few lines of image every second and though the document got ready, the end user is under the impression the document is still loading.

baselineloading

Progressive JPEG rendering

DEMO: link here
Progressive JPEGs are special kind of JPEGs which has to undergo few processes to create progressive JPEG from normal JPEG. The progressive JPEGs render in a different way – interlaced. Meaning, all the rows are rendered with first with minimum detail and as download progresses, the quality of image improves.

progressive-anim

As you can see, the entire picture is visible right from the time page is loaded except the data is fetched continuously to enhance the picture.

Both, baseline and progressive will delay the load event.

Creating Progressive Images (Mac OS X)

jpegtran -copy none -optimize hawkeye-original.jpg > hawkeye-opt.jpg
jpegtran -copy none -progressive hawkeye-opt.jpg > hawkeye-progressive.jpg

Progressive takes almost the same computation memory and won’t bring the browser down. However, JPEGs are a compressed format and progressive is much more optimized in it but this cannot be said for other formats. PNG renders better than JPEG in progressive.

Simulate Progressive with JS

DEMO: link here
This is an idea to load the cheapest version of the image first and in a separate thread update with a HD version.

lazy1


lazy2


The image attribute should have low quality src and a reference to high quality src for us to load later.

<?php 
     <img refresh="http://ksankaran.com/img/hawkeye-original.jpg?time=<?php echo time(); ?>" src="http://ksankaran.com/img/hawkeye-small.jpg?time=<?php echo time(); ?>" width="100%">
?>

On document ready, create a timeout thread to update the src:

$(document).ready(function() {
     window.setTimeout(function() {
           $('img[refresh]').each(function(idx, element) {
                 var refreshURL = $(element).attr('refresh');
                 $(element).attr('src', refreshURL);
           });
     }, 200);
});

With this JS simulation, we get a better user experience and document load is fired right after the low quality version is loaded. The only disadvantage is, increased network traffic with small and HD version loading for every image. However, if it is used for only HD images on the page, this is an great approach.