Introduction

The article explains how to generate dynamic script from a backend language, such as PHP in this case. There are many reasons to choose a dynamic script over generation of JSON data that client can write script on such as 1) Restrict the client from manipulating data. 2) just provide a helper API that would just do the job. 3) Formation of feasible JS data structure is not possible.

Prerequisites

The article assumes that user knows PHP and JavaScript basics. We will be trying to read the .properties file from php, parse the configuration, understands what user wants to, prints the logic in JS and load the same in HTML to test the logic. I would also recommend you have some basic knowledge on recursive method call techniques as well. To know more on recursion, please read here.

Defining a Problem Statement

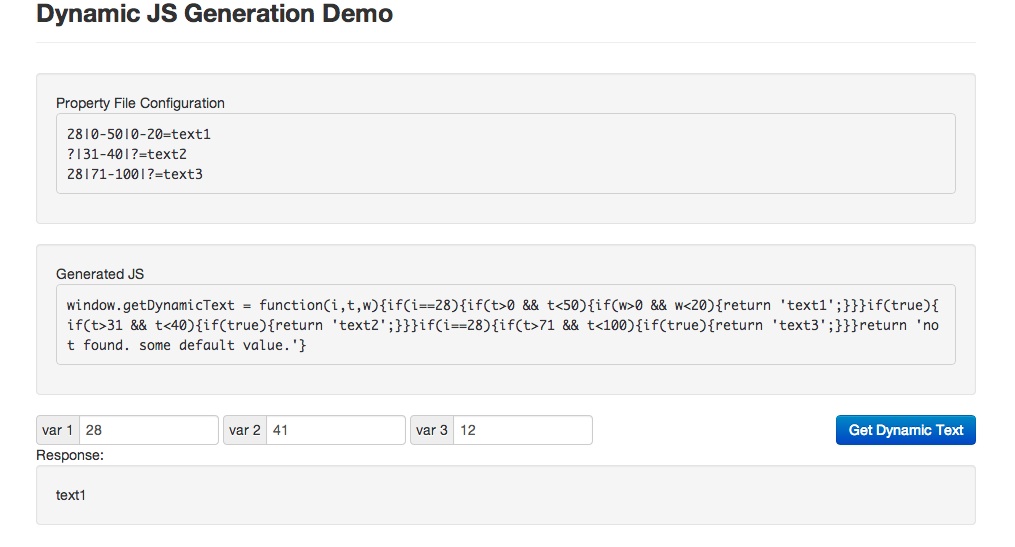
Let’s try and define the problem we are trying to solve. Consider a use-case where you have a properties file on the server and we have to use this file to show a message in the front end. Well, it is not a straightforward map of key1 to value1. Assume that, it is complex configuration of three level key to a value and each level can have wild card character ‘?’ to accept any value at that level or contain range at every level. Example: “28|71-100|?=text3″ -> if level1 value is 28 and level2 value is between 71 and 100 and level3 at any value, then the text to be used is “text3″.

Parse Properties and Generate Script

Assume that our file has one configuration per line and the first step is to understand the properties file and getting ready for generation.

$key1 = 't';
$key2 = 'w';
$key3 = 't';
function get_object_from_params($paramStr, $assignValue, $label) {
    if($paramStr == '?') {
        $paramObj = Array(
            $label => $assignValue
        );
    }
    else {
        $ranges = preg_split("/-/", $paramStr);
        if(count($ranges) == 2) {
            $paramObj = Array(
                ">" => $ranges[0],
                "<" => $ranges[1],
                $label => $assignValue
            );
        }
        else {
            $paramObj = Array(
                "==" => $ranges[0],
                $label => $assignValue
            );
        }
    }
    return $paramObj;
}
 
function parse_icon_config($txtProperties) {
    $result = array();
    $lines = preg_split("/\n/", $txtProperties);
    global $key1, $key2, $key3;
    foreach($lines as $i => $line) {
        $lineparts = preg_split("/=/", $line);
        $textvalue = $lineparts[1];
        $configparts = preg_split("/\|/", $lineparts[0]);
        if(count($configparts) == 3) {
            $windSpeed = $configparts[2];
            $temp = $configparts[1];
            $iconCode = $configparts[0];
 
            $windObj = get_object_from_params($windSpeed, $textvalue, $key3);
            $tempObj = get_object_from_params($temp, $windObj, $key2);
            $iconObj = get_object_from_params($iconCode, $tempObj, $key1);
 
            array_push($result, $iconObj);
        }
    }
 
    return $result;
}
 
$properties = file_get_contents('config/iconconfig.properties');
$propertiesObj = parse_icon_config($properties);

The above snippet parses the configuration file and generates array of config objects – one per each line. Since there is a three level key and each level parsing is almost the same, lets write a recursive method to generate the script.

function recursive_print($obj, $label) {
    global $key3;
    if(is_string($obj)) {
        return ('return \'' . $obj . '\';');
    }
 
    foreach ($obj as $key => $value) {
        if($key != '==' && $key != '>' && $key != '<') {
            $nextLabel = $key;
            $nextObj = $value;
        }
    }
    if(array_key_exists("==", $obj)) {
        return 'if(' . $label . '==' . $obj['=='] . '){' . recursive_print($nextObj, $nextLabel) . '}';
    }
    else if(array_key_exists(">", $obj) && array_key_exists("<", $obj)) {
        return 'if(' . $label . '>' . $obj['>'] . ' && '. $label .'<' . $obj['<'] . '){' . recursive_print($nextObj, $nextLabel) . '}';
    }
    else {
        return 'if(true){' . recursive_print($nextObj, $nextLabel) . '}';
    }
}
 
function get_function_text($iconCodesConfig) {
    global $key0,$key1,$key2;
    $functionCode = '';
    foreach ($iconCodesConfig as $iconConfig) {
        $functionCode .= recursive_print($iconConfig, $key0);
    }
    return 'window.getDynamicText = function('.$key0.','.$key1.','. $key2.'){' . $functionCode . 'return \'not found. some default value.\'}';
}

At each level, we analyze the data and print the appropriate conditionals in the JavaScript and then call the same method again with the next level until we reach the last level.

Our javascript generation is ready, when the PHP is requested, this is what we get:
jsgenresponse

Now, using it in our HTML is quite easy. As many other APIs out there, it loads in the window namespace and waits for us to call.

<script src="jsgen.php"></script>
....
<button ... onclick="validateAndGet()">Get Dynamic Text</button>

Here is a demo link.

demosnap

Conclusion

What did we just do: we discussed a set of use cases when we need a dynamic script rather than just data, picked up a particular scenario and worked on the same to generate a dynamic javascript using PHP and recursion techniques.

Prerequisites

The article assumes the reader knows the basics of AngularJS. The article shows how the cache logic can be written in JavaScript but the UI render is done using AngularJS. A non-angular reader can still choose to continue reading through the article and can get the logic bits from the code. I leave it up to you.

Introduction

In real world, where we have CMS (Content Management System) to assemble our page with modules and each module function independently. The modules are developed by independent developers and the page is assembled by, probably, a different user altogether. AJAX calls are always meant to enhance user experience, but given the fact the each module function independently, there seems to a duplication of AJAX calls made on the page, probably by different modules. This post shows a way, how to cache such AJAX calls with the help of jQuery promise and a JavaScript object.

jQuery Promises

As name suggests, jQuery Promise is a literal promise made by jQuery that a call will be made on the object after its completion. The object is just like an JavaScript object and can be passed around like a ball to any method you want and any number of times you want. For more, read here.

Details

Now that you have an idea of what we are going to do, let me take you through each step of the process.

Constructing an deferred object cache

I will try not to include AngularJS code in the sample but in some places it is unavoidable. Assuming that “command” is the part of the URL and “params” are the parameter key-value map, here is a snapshot of constructing a cache map.

var cacheStorage = {};
 
function getCacheKey(command, params) {
    var paramStr = command + '-';
    if(params) {
        var keys = [];
        for(var key in params) keys.push(key);
        var sortedKeys = keys.sort();
        for(var count=0; count < sortedKeys.length; count++) {
            var sKey = sortedKeys[count];
            paramStr += (sKey + '-' + params[sKey] + (count < sortedKeys.length-1 ? '-' : ''));
        }
    }
    return paramStr;
};
 
var ret = {
    get : function(command, params) {
        var paramKey = getCacheKey(command, params);
        var cachedObj;
        if(paramKey.length > 0) {
            cachedObj = cacheStorage[paramKey];
        }
        if($rootScope.debug) {
            $log.log(paramKey + " => " + (cachedObj ? 'hit' : 'undefined'));
        }
        return cachedObj;
    },
 
    put : function(command, params, deferredObj) {
        var paramKey = getCacheKey(command, params);
        if(paramKey.length > 0) {
            cacheStorage[paramKey] = deferredObj;
        }
    }
};
 
return ret;

Explanation: If you know Angular, you probably knew about $log and $rootScope. If not, just assume that these are variables injected by Angular API. The cache tries to form a key and save the object in the cache map for the key. We sort the params before forming the key because we do not want to duplicate the same object just because user gave params in a different order.

Data Source Client

Now that, our cache is ready, we need to implement a client which uses this cache and can be a interface to all the modules on the page. The requirements of the client is, to provide a generic interface to all the calls to a particular website because we wrote the cache store for a single domain. If multiple domains are involved, it is only a matter of time we edit the cache storage to modify key that includes domain name or the complete url.

var url_defaults = { key: $rootScope.key };
 
function doDSCmd( command, params ) {
    if(!params) { params={};}
    var cachedObj = dsCacheStore.get(command, params);
    if(cachedObj) {
        return {
            'deferredObj' : cachedObj,
            'fromCache' : true
        };
    }
    var url = $rootScope.server + "/" + command + ".json";
    var deferredObj = $http.get(url, { params: angular.extend( {}, url_defaults, params ) } );
 
    deferredObj.success(function (data, status) {
            if($rootScope.debug) {
                $log.log(command + ": " + JSON.stringify(data));
            }
        })
        .error(function (data, status) {
            $log.error("error $http failed with " + status + " for " + url);
        });
 
    dsCacheStore.put(command, params, deferredObj);
    return {
        'deferredObj' : deferredObj,
        'fromCache' : false
    };
};
 
var ret = {
    executeCommand : function(command, params) {
        return doDSCmd(command, params);
    }
};
 
return ret;

Explanation: We are trying to provide a interface with just one public method: executeCommand – which means executing a JSON call. The client is trying to read from cache and if not found, it creates a promise object by var deferredObj = $http.get(url, { params: angular.extend( {}, url_defaults, params ) } );. Consider this, as a jQuery equivalent of $.ajax(). Now, this promise is stored in the cache. Next time, when we get a hit from the cache, we get the promise object. Since, you always get a promise object, your module can always use .success on the promise every time it executes. If the call is already completed, your .success callback is called immediately else it waits. Here is the trick, since you are not creating a new promise, AJAX call is NOT made. Instead, it works on the existing promise object and gets the response from the promise – how many ever times you want.

Sample Module Usage

Here is an example of how to call from a module.

var commandOutput = dsClient.executeCommand(callObj.call, callObj.params);
var fromCache = commandOutput.fromCache;
commandOutput.deferredObj.success(function(response) {
     .....
});

NOTE: The JSON call is used for demo purposes. However, JSONP also works and you just have to change from $http.get to $http.jsonp.

Here is a complete

demo

Conclusion

What did we just do: We learned a bit about jQuery promise, how to implement a cache store that stores jQuery promises for a given url and params, how to implement a client API which makes of cache store and provide a public interface to make AJAX calls and how to write a module that makes use of the client.

Introduction

This article will discuss on the various image loading techniques in web and functionality of each of them. Mostly, we write img tags and leave it at that and we don’t care what happens from there. But, it’ll really comes back to haunt us later when there are plenty of images on the site and web site drags itself.

Techniques

Baseline JPEG rendering

DEMO: link here
Baseline JPEGs are the default JPEG files we use. The images are rendered from top to bottom with each layer after another. Please look at the below GIF for understanding the loading process.

baseline-anim

Now to the details, the image is fetched from the server and as soon as it gets a line, it draws there. As you can see from a test below, it took 7.6 seconds to complete the image rendering and the spinner was spinning till the end – which means, you are having a bad user experience of just painting few lines of image every second and though the document got ready, the end user is under the impression the document is still loading.

baselineloading

Progressive JPEG rendering

DEMO: link here
Progressive JPEGs are special kind of JPEGs which has to undergo few processes to create progressive JPEG from normal JPEG. The progressive JPEGs render in a different way – interlaced. Meaning, all the rows are rendered with first with minimum detail and as download progresses, the quality of image improves.

progressive-anim

As you can see, the entire picture is visible right from the time page is loaded except the data is fetched continuously to enhance the picture.

Both, baseline and progressive will delay the load event.

Creating Progressive Images (Mac OS X)

jpegtran -copy none -optimize hawkeye-original.jpg > hawkeye-opt.jpg
jpegtran -copy none -progressive hawkeye-opt.jpg > hawkeye-progressive.jpg

Progressive takes almost the same computation memory and won’t bring the browser down. However, JPEGs are a compressed format and progressive is much more optimized in it but this cannot be said for other formats. PNG renders better than JPEG in progressive.

Simulate Progressive with JS

DEMO: link here
This is an idea to load the cheapest version of the image first and in a separate thread update with a HD version.

lazy1


lazy2


The image attribute should have low quality src and a reference to high quality src for us to load later.

<?php 
     <img refresh="http://ksankaran.com/img/hawkeye-original.jpg?time=<?php echo time(); ?>" src="http://ksankaran.com/img/hawkeye-small.jpg?time=<?php echo time(); ?>" width="100%">
?>

On document ready, create a timeout thread to update the src:

$(document).ready(function() {
     window.setTimeout(function() {
           $('img[refresh]').each(function(idx, element) {
                 var refreshURL = $(element).attr('refresh');
                 $(element).attr('src', refreshURL);
           });
     }, 200);
});

With this JS simulation, we get a better user experience and document load is fired right after the low quality version is loaded. The only disadvantage is, increased network traffic with small and HD version loading for every image. However, if it is used for only HD images on the page, this is an great approach.