Introduction

Yeoman is a very good framework for doing three things 1) scaffolding 2) dependency management and 3) build, preview & test. Yo is the component which does the code scaffolding and we are going to look a bit deeper on how to tune the generators to suit our need and structure.

Installing Yeoman and Git Protocol Problems

When dependencies are pulled via github, the protocol followed is git:// and is blocked by firewall at few places. In order for that to resolve, you need to make sure git uses http(s) instead of git. So, please execute the following line to make sure GIT follows HTTP protocol.

git config --global url."https://".insteadOf git://

After the above steps you should not have problems when using npm install or bower install.

npm install generator-angular generator-karma  # install generators
yo angular                     # scaffold out a AngularJS project
npm install && bower install   # install default dependencies
bower install angular-ui       # install a dependency for your project from Bower
grunt test                     # test your app
grunt server                   # preview your app
grunt                          # build the application for deployment

Yeoman Generators

If you take a look at line 1 on the above snippet, if installs angular generator. So, lets take a look at how to scaffold out a AngularJS directive:

vsankaran-ml2:yeoman3 ksankaran$ yo angular:directive thing1
   create app/scripts/directives/thing1.js
   create test/spec/directives/thing1.js

When you install angular generator using “npm install angular-generator”, it may not installed in the actual yo library for users in Mountain Lion (10.8) or greater. So, if you execute the command “yo angular:directive thing1″, you might get an error saying that generator is not registered. To fix, please execute the following commands.

cd /usr/local/lib/node_modules/yo
npm install generator-angular

As you can see from above, it creates two things: 1) the directive itself and 2) the test case for the directive. This is where Yeoman’s strength is.

yo1

Modify Generator Behavior

Ok, now that we have scaffolded out a directive, how do I make sure that we scaffold out in a proper structure that we wanted to? The answer is not simple and we have to modify generator’s source to achieve that. I know, this is extremely dangerous, but the path and other stuffs is “hardcoded” in the generator code. Before we dig deep into the generator code, please understand that the generator code is located at: /usr/local/lib/node_modules/yo/node_modules/generator-angular.

Now, lets take a look at directive generator code snippet in index.js inside directives (which is inside the generator code) folder:

Generator.prototype.createDirectiveFiles = function createDirectiveFiles() {
  this.appTemplate('directive', 'scripts/directives/' + this.name);
  this.testTemplate('spec/directive', 'directives/' + this.name);
  this.addScriptToIndex('directives/' + this.name);
};

The line this.appTemplate generates the directive file inside script/directives folder. Now we wanted to pass in an extra argument to accomodate module parameter, so that the file gets dropped at scripts/module_name/directives folders (this is just an example and not a final structure). You need to modify the code above like this:

Generator.prototype.createDirectiveFiles = function createDirectiveFiles() {
  if(this.args && this.args[1]) {
        var module = this.args[1];
        this.appTemplate('directive', 'scripts/'+module+'/directives/' + this.name);
  }
  else {
        this.appTemplate('directive', 'scripts/directives/' + this.name);
  }
  this.testTemplate('spec/directive', 'directives/' + this.name);
  this.addScriptToIndex('directives/' + this.name);
};

Now, on executing the command

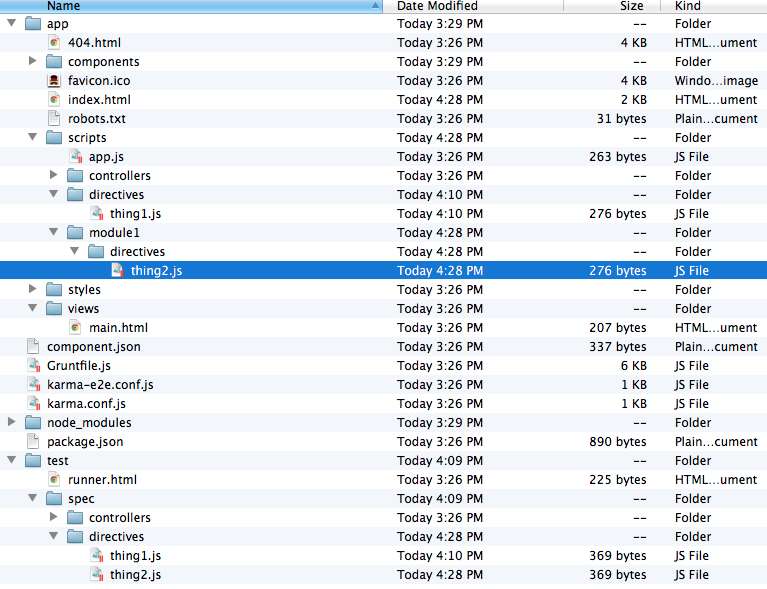
vsankaran-ml2:yeoman3 ksankaran$ yo angular:directive thing2 module1
   create app/scripts/module1/directives/thing2.js
   create test/spec/directives/thing2.js

it creates a module1 folder and places the directive file inside it. If you want to change the test script file location, you can change the this.testTemplate command.

yo2

That’s it folks. This is how you modify yo generator code for angular.

Introduction

This tutorial will help you learn many things – how to use MongoLab API for CRUD operations, how to get browser info and version and how to use google charts. What we are going to achieve is, to create a real-time page which keeps updating the hits with browser info and also renders the page with the stats.

googlechart

Pre-requisite

You should at least know what MongoDB is and the flexibility it offers. You can read it right here. MongoLab is the cloud API provider for MongoDB. It also provides a REST interface for the same. Opening a account is free and so I would advise you to get one in case if you wanted to try MongoLab in your small projects. Do NOT try and use the key I used in my JavaScript. It’s not going to cost me anything because its a free account but again, I would have to manually login and clear those items if you use my ID for your demo apps :).

Storing browser info

The idea is to figure out the browser name and version and if it is already in DB, just increment the hit number else insert a new row.

/*
    Util method to get browserName and browserVersion from navigator. Source: stackoverflow.com.
 */
navigator.sayswho = (function () {
    var N = navigator.appName,
        ua = navigator.userAgent,
        tem;
    var M = ua.match(/(opera|chrome|safari|firefox|msie)\/?\s*(\.?\d+(\.\d+)*)/i);
    if (M && (tem = ua.match(/version\/([\.\d]+)/i)) != null) M[2] = tem[1];
    M = M ? [M[1], M[2]] : [N, navigator.appVersion, '-?'];
    return M;
})();
if (navigator.sayswho.length > 1) {
    navigator.cBrowserName = navigator.sayswho[0];
    navigator.cBrowserVersion = navigator.sayswho[1];
}

Now you do have browser name and version after the above steps. The task is to figure out whether the row is already present in DB or not. Querying the DB is easy with JavaScript but it is a shame that you can’t do that for commercial website because people will use the key to query your DB directly.

$.ajax( { url: "https://api.mongolab.com/api/1/databases/webdev/collections/hits?apiKey=<YOUR_KEY>&q=" + queryStr,
        type: "GET",
        contentType: "application/json",
        async: true,
        timeout: 5000,
        success: function (data) {
            ..
        },
        error: function (xhr, status, err) {}
    });

The insert and update code is pretty straightforward.

function updateDB(browser, version, hits) {
    var queryObj = {"browser": browser, "version": version};
    var queryStr = JSON.stringify(queryObj);
    // API Key needs to be changed to yours. This key is, however, a free limited space key and you can get one for yourself.
    // https://mongolab.com/welcome/ : Sign up and get 500MB free.
    $.ajax( { url: 'https://api.mongolab.com/api/1/databases/webdev/collections/hits?apiKey=<YOUR_KEY>&q=' + queryStr,
        data: JSON.stringify( { "$set" : { "hits" : hits } } ),
        type: "PUT",
        contentType: "application/json"
    });
}
 
/*
    Insert the new browser info here.
 */
function insertToDB(browser, version) {
    // API Key needs to be changed to yours. This key is, however, a free limited space key and you can get one for yourself.
    // https://mongolab.com/welcome/ : Sign up and get 500MB free.
    $.ajax( { url: "https://api.mongolab.com/api/1/databases/webdev/collections/hits?apiKey=<YOUR_KEY>",
        data: JSON.stringify( { "browser" : browser, "version" : version, "hits" : 1} ),
        type: "POST",
        contentType: "application/json"
    });
}

The posting part is now over.

Get browser stats

Let’s query the DB with browser name as sort order.

$.ajax( { url: "https://api.mongolab.com/api/1/databases/webdev/collections/hits?apiKey=<YOUR_KEY>&s="+queryStr,
    type: "GET",
    contentType: "application/json",
    async: true,
    timeout: 5000,
    success: function (data) {
        ..
    },
    error: function (xhr, status, err) { }
});

Google charts is a fantastic API to display charts. It is the easiest way and also the best I’ve seen.

google.load("visualization", "1", {packages:["corechart"]});
google.setOnLoadCallback(&lt;callbackmethod_to_query_DB&gt;);
.......
// after query
var data = google.visualization.arrayToDataTable(browserData);
var options = {title: 'Browser Stats'};
var chart = new google.visualization.PieChart(document.getElementById('chart_div'));
chart.draw(data, options);

That’s it folks! Take a look at demo here.

Introduction

It’s been sometime I’ve been here. So, I will just get started off. Today, I’m going to write about how to develop tic-tac-toe using AngularJS. The demo is more to understand the possibilities and simplicity of the framework.

What’s needed in the UI

9 boxes arranged in a 3×3 fashion like below:
square-design

Each of these boxes are divs and each div is binded to the data behind as usual

Template:

<div ng-repeat="row in rows">
    <div id="{{column.id}}" ng-repeat="column in row">
        <div ng-click="markUserClick(column)"> </div>
    </div>
</div>

Data:

$scope.rows = [
    [
        {'id' : 'A11','letter': '','class': 'box'},
        {'id' : 'A12','letter': '','class': 'box'},
        {'id' : 'A13','letter': '','class': 'box'}
    ],
    [
        {'id' : 'B11','letter': '','class': 'box'},
        {'id' : 'B12','letter': '','class': 'box'},
        {'id' : 'B13','letter': '','class': 'box'}
    ],
    [
        {'id' : 'C11','letter': '','class': 'box'},
        {'id' : 'C12','letter': '','class': 'box'},
        {'id' : 'C13','letter': '','class': 'box'}
    ]
];

Now, the logic is to make the JS think engine. It’s easy when you follow the strategy mentioned in wiki.

AI Algorithm:

  1. Win: If the AI has two in a row, it will place a third to get three in a row.
  2. Block: If the [opponent] has two in a row, the AI will play the third to block the opponent.
  3. Fork: Creation of an opportunity where the AI has two threats to win (two non-blocked lines of 2).
  4. Blocking an opponent’s fork:
    1. The AI will create two in a row to force the opponent into defending, as long as it doesn’t result in them creating a fork. For example, if “X” has a corner, “O” has the center, and “X” has the opposite corner as well, “O” must not play a corner in order to win. (Playing a corner in this scenario creates a fork for “X” to win.)
    2. If there is a configuration where the opponent can fork, the player should block that fork.
  5. Center: AI marks the center. (If it is the first move of the game, playing on a corner gives “O” more opportunities to make a mistake and may therefore be the better choice; however, it makes no difference between perfect players.)
  6. Opposite corner: If the opponent is in the corner, the AI plays the opposite corner.
  7. Empty corner: The AI plays in a corner square.
  8. Empty side: The AI plays in a middle square on any of the 4 sides.

For TicTacToe DEMO : Click Here.

That’s it folks. Enjoy playing.